
Trial and Crucifixion
"Nail Cross" Art Workshop Lesson
Note: There are several posts in this topic about making nail crosses. The following kicks off the subject!
Summary of Lesson Activities:
Make cross nail necklaces to help children remember that Jesus died so that we could have eternal life.
Scripture Reference:
Matthew 26:47-27:61; Mark 14:43-15:47; Luke 22:47-23:56; John 18:2-19:42
Key Bible Verse:
There the soldiers nailed Jesus to his cross. Luke 23:3 (International Children's Bible)
Materials List:
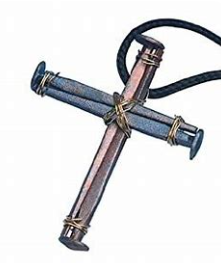
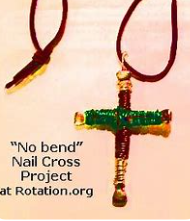
- Nails. The "horseshoe" square kind are recommended because they are similar in shape to the "spikes" we believe were used by the Roman soldiers. They are also less pointy! Note the way they are assembled so that their points are safely not at the 'ends' of the cross pieces. Note that we don't recommend those nail cross where the nails are bent to create necklace loop as this takes too much time, and attaching a wire loop is easier.
- Craft wire, various colors
- Glue gun or instant glue
- Strips of leather thong to make the necklace.
Editor's Note: This is a lesson sketch. Enrich as needed.
Lesson Plan
Opening:
Greet the children and introduce yourself.
Open with prayer.
Dig:
- Read the story of Jesus' crucifixion from your preferred source, classroom Bibles or perhaps a storybook Bible.
- Review the story--answering any questions the class may have--to make sure the children understand it.
Why did some people want to kill Jesus?
What was it about his message they didn't like?
What were the Romans afraid of?
What type of Messiah did some people expect? (When Jesus didn't fit their definition, they charged him with blasphemy -- claiming to be the Messiah, etc.) - Introduce the activity by explaining to the children that they are making crosses to help them remember the story of Jesus' crucifixion and that he suffered to bring us the message of our forgiveness, our salvation.
- Tell them that they can wear their crosses or hang them up in their rooms, etc. They can also give the cross to someone else; to help that person remember that Jesus died for us.
- Give each child four nails. Remind them that Jesus was nailed to the cross in three places--each hand and his feet. Help the children bind two of the nails together, using craft wire. You may want to use a glue fun to glue the nails together for younger children. These nails form the horizontal cross bar. Bind them to the second pair of nails using craft wire.
- Take another piece of wire and form it into a loop for where the leather necklace can be looped. To fasten it to the nails, twist the ends loop wire around the top of the vertical nail, Wrap additional wire over the loop wire to fix it to the cross. The GLUE can be used to make sure the ends of the wire stay tucked in.
- Thread a strip of leather through the loop and tie it to complete the necklace.
NOTE: Use rough square nails and pair them end-to-head so that no sharp point is sticking out on its own. Depending on your nail source, you can get a longer length for the vertical portion of the cross.
You can WRAP colored wire around parts of the nail to add color and texture.
If kids finish their crosses and time is left, encourage them to make another cross to give away. Or suggest that they make another cross out of different materials (e.g., pipe cleaners, craft sticks, wire and beads, crayons).
Reflection:
Invite each student to share their cross and explain what it will "remind them of." Conclude by piling them in the middle of the table and do a "laying on of hands" reminding the kids of the meaning, and asking God to bless us as these necklaces remind us "WHAT" Jesus did for us to "WHOM" we belong.
Originally posted by a member of the Irvington Presbyterian, Irvington, IN, and enhanced by members of our Content Team.


